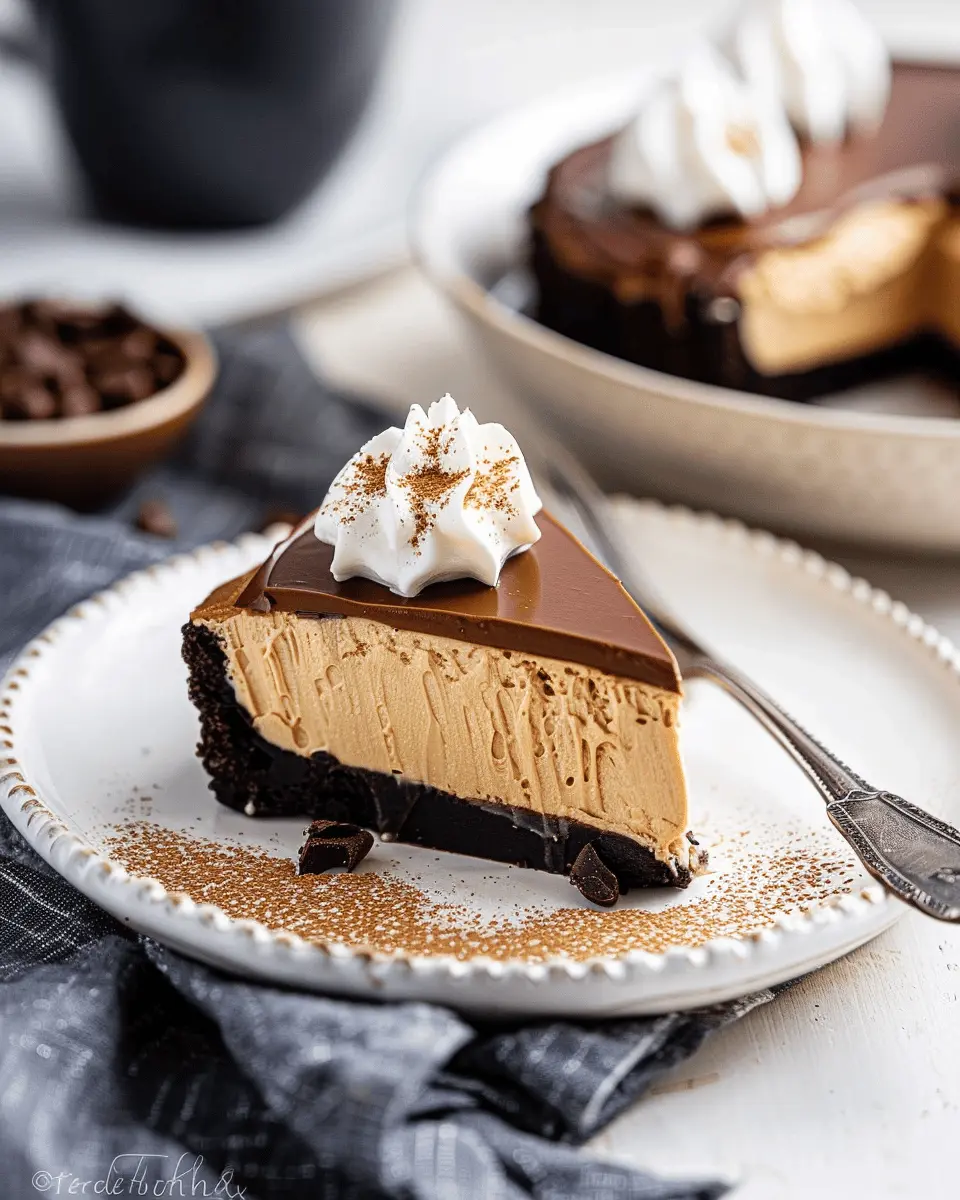
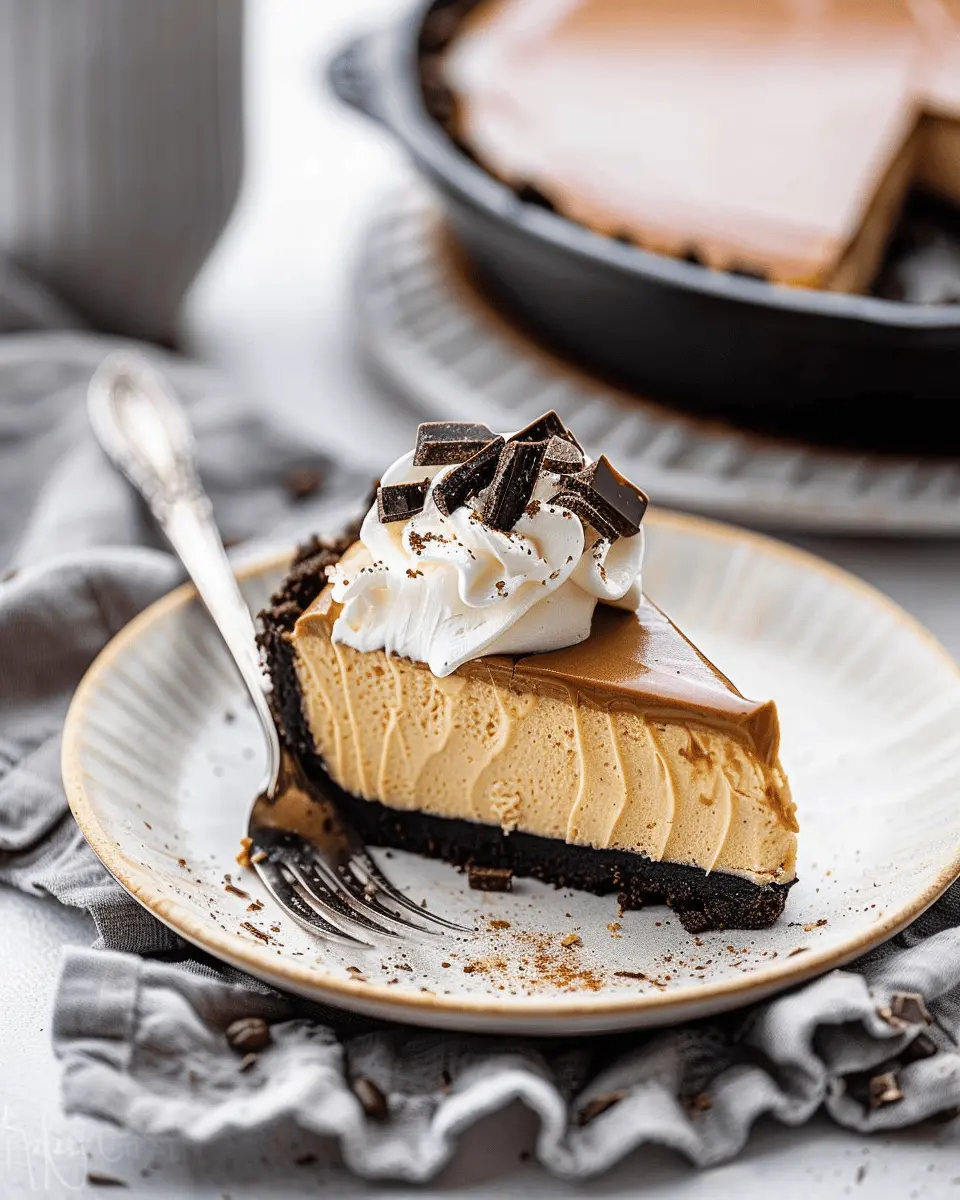
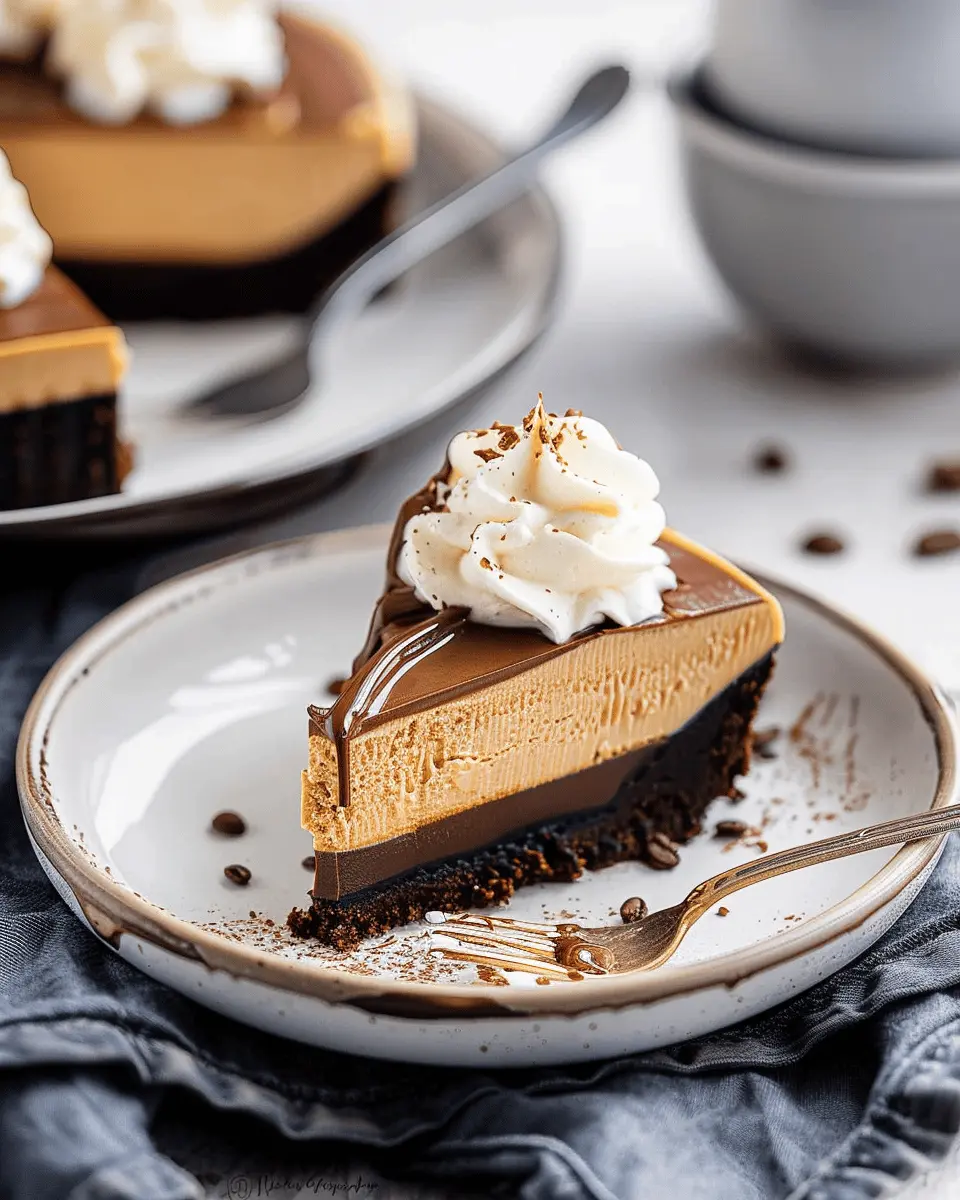
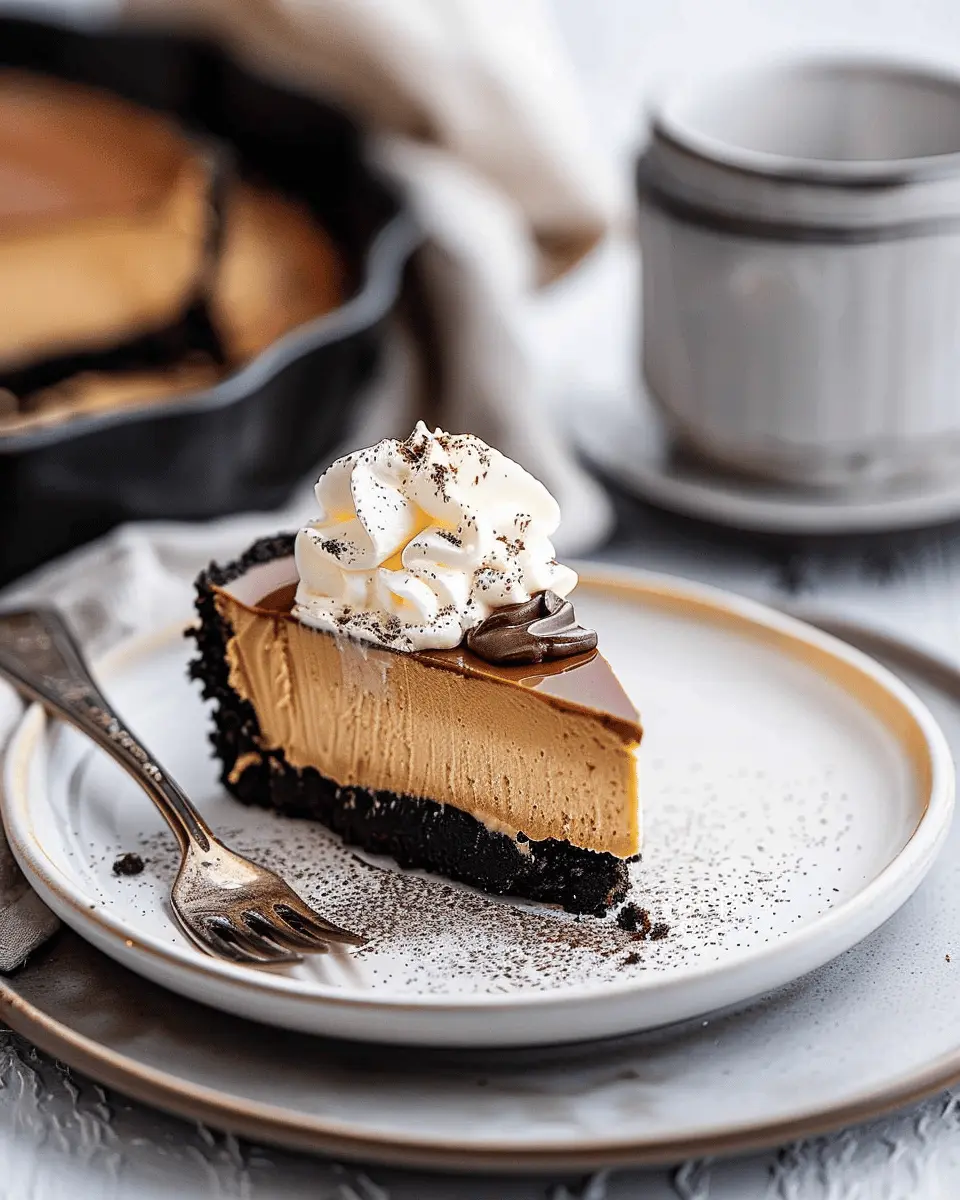
Introduction to Silky Coffee Cheesecake
Discovering the Joy of Homemade Desserts
There’s something truly magical about homemade desserts, isn’t there? The comforting aroma of freshly baked goods wafting through your kitchen, the anticipation building with every minute that passes, and the joy that comes from sharing your creations with friends and family. One dessert that perfectly encapsulates this joy is the silky coffee cheesecake. With its luscious texture and rich flavor, it’s bound to impress anyone lucky enough to take a bite.
Let’s face it; life can be hectic. With work commitments and social engagements filling our calendars, finding time to create something delicious can feel challenging. However, making your own cheesecake doesn’t have to be an overwhelming task. In fact, this silky coffee cheesecake recipe offers a simple yet elegant way to indulge your sweet tooth without requiring advanced baking skills.
Did you know that according to the National Restaurant Association, desserts are one of the top reasons people dine out? While it may be tempting to grab a slice from your local bakery, whipping up this cheesecake at home allows you to customize it to your taste. Fancy a stronger coffee flavor? Add a shot of espresso! Want to elevate the dessert even further? We’ll be topping it off with a rich chocolate ganache, creating a match made in heaven.
If you’re looking for ways to impress your friends at your next gathering, why not be the one who bakes the show-stopping dessert? Just imagine presenting this gorgeous cheesecake, glistening with chocolate ganache, paired with a selection of fresh berries or a warm cup of coffee. It’s conversations waiting to happen, and memories just waiting to be made.
As we dive into this delicious recipe, keep in mind that the best part about homemade desserts is the love and effort you put into making them. So, grab your apron, and let’s get started on making that silky coffee cheesecake that will surely delight your taste buds. Check out more on baking tips from The Spruce Eats for additional inspiration!
Ingredients for Silky Coffee Cheesecake
Creating a silky coffee cheesecake is all about balance and quality ingredients. Let’s break down what you’ll need to make this delectable dessert, from the base to the luscious topping.
Essential ingredients for the cheesecake base
To achieve that creamy texture, you’ll want:
- Cream cheese: 24 ounces, softened for easy mixing.
- Granulated sugar: 1 cup, to add sweetness.
- Sour cream: 1 cup, for extra creaminess and tang.
- Vanilla extract: 1 teaspoon, to enhance the flavor profile.
- Eggs: 3 large, to bind everything together.
Using fresh, high-quality ingredients will elevate this cheesecake to new heights—trust me!
Key ingredients for the coffee flavor
For that rich coffee essence, gather these:
- Instant coffee granules: 2 tablespoons, dissolved in hot water for maximum flavor.
- Espresso powder: 1 tablespoon, for an intense coffee punch.
- Coffee liqueur (optional): 2 tablespoons, for added depth.
Curious about the differences between various coffee options? You can read more in this coffee guide.
Topping essentials
The crowning glory of your silky coffee cheesecake deserves special attention:
- Dark chocolate: 8 ounces, for a velvety ganache.
- Heavy cream: 1 cup, to create that rich, glossy topping.
- Coffee beans: For decoration, adding an elegant touch.
Remember, the ingredients you choose significantly impact not just the taste but also your overall baking experience! So gather these essentials, and get ready to whip up something extraordinary.
Step-by-step Preparation of Silky Coffee Cheesecake
If you’re a fan of rich desserts that combine the goodness of coffee and the indulgence of cheesecake, then this silky coffee cheesecake with chocolate ganache is about to become your favorite treat! Let’s dive into a simple, step-by-step process that will help you create this delightful dessert.
Gather Your Ingredients and Equipment
Before rolling up your sleeves, it’s essential to gather everything you need. This not only saves time but also keeps the cooking process smooth and enjoyable. For our silky coffee cheesecake, you’ll need:
Ingredients:
- 2 cups of graham cracker crumbs
- 1/2 cup of unsalted butter, melted
- 3 (8 oz) packages of cream cheese, softened
- 1 cup of granulated sugar
- 1 cup of sour cream
- 1/4 cup of freshly brewed coffee (cooled)
- 2 teaspoons of vanilla extract
- 3 large eggs
For the Chocolate Ganache:
- 1 cup of heavy cream
- 8 oz of semi-sweet chocolate, chopped
Equipment:
- 9-inch springform pan
- Mixing bowls
- Electric mixer
- Rubber spatula
- Measuring cups and spoons
- Baking sheet
- Whisk and small saucepan
Prepare the Cheesecake Crust
The crust sets the stage for your silky coffee cheesecake, adding a delightful crunch. Here’s how to create it:
- Preheat your oven to 325°F (160°C).
- In a mixing bowl, combine the graham cracker crumbs and melted butter. Mix until the crumbs are well-coated and have a sandy texture.
- Press this mixture evenly into the bottom (and slightly up the sides for an extra touch) of your springform pan. It should be firm enough to hold its shape once baked.
- Bake for 10 minutes, then let it cool while you prepare the cheesecake filling. This step adds a nice golden color and enhances the flavor.
Blend the Silky Coffee Mixture
Now for the star of the show! Creating a silky coffee cheesecake filling is simpler than you might think:
- In a large mixing bowl, beat the cream cheese until it’s creamy and smooth.
- Gradually add sugar and mix until well combined.
- Pour in the sour cream, cooled coffee, and vanilla extract, mixing until everything is silky smooth.
- Add the eggs one at a time, beating on low speed just until blended. Avoid over-mixing to keep the cheesecake light and airy.
Combine and Pour into the Crust
With your filling whipped to perfection, it’s time to combine everything:
- Pour the silky coffee cheesecake mixture onto the cooled crust, making sure it’s evenly spread.
- Tap the pan gently on the counter to release any air bubbles—this little trick helps to keep your cheesecake smooth.
Bake to Perfection
Baking is where the magic happens. Here’s how to ensure your cheesecake is just right:
- Place your springform pan on a baking sheet to catch any potential spills.
- Bake in the preheated oven for about 50–60 minutes. You want the edges set and the center slightly jiggly but not liquid.
- Once done, turn off the oven and crack the door open slightly. This gradual cooling helps prevent cracking.
Chill and Set
The waiting game begins! Properly chilling your cheesecake will turn it into the velvety dessert you crave:
- Once cooled to room temperature, cover the cheesecake with plastic wrap and refrigerate for at least 4 hours (or overnight for the best results).
- While it’s chilling, prepare the chocolate ganache by heating the cream in a saucepan. Once hot, pour it over the chopped chocolate and stir until smooth.
- After chilling, pour the ganache over your cheesecake, letting it drip down the sides for a dazzling presentation.
And there you have it—the delicious silky coffee cheesecake with chocolate ganache is ready to impress! Trust me, your friends and family will be asking for seconds. Enjoy every bite and don’t forget to share this recipe with fellow coffee and cheesecake lovers!
For more cheesecake tips and delicious coffee-infused desserts, check out this guide to cheesecake baking for more inspiration.
Variations of Silky Coffee Cheesecake
If you love the rich flavors of silky coffee cheesecake, you’re in for a treat! This dessert is incredibly versatile, allowing you to play around with different additions and flavors. Here are two delightful variations that are perfect for impressing friends or enjoying a cozy night in.
Mocha Silky Cheesecake
For chocolate lovers, the mocha variation is a must-try! Imagine the lusciousness of a classic cheesecake blended with the robust flavors of espresso and dark chocolate.
- Ingredients: In addition to your usual cheesecake base, add:
- 1 cup brewed espresso or strong coffee
- 4 oz melted bittersweet chocolate
- Instructions: Fold the melted chocolate and coffee into your cream cheese filling. This addition not only enhances the flavor but also gives it a beautiful marbling effect when baked.
Caramel Coffee Swirl Cheesecake
Want something a bit sweeter? The caramel coffee swirl variation offers a delightful twist that’s sure to satisfy your sweet tooth.
- Ingredients: You’ll need:
- 1/2 cup caramel sauce (store-bought or homemade)
- 1 cup brewed coffee
- Instructions: Mix the coffee into your filling, and swirl in the caramel sauce just before baking. This adds a fantastic interplay of flavors that will elevate your silky coffee cheesecake to new heights!
Both variations are not just delicious but also easy to make! You can check out more inspiring flavors at Serious Eats for ideas that suit your palate.
So, which one are you excited to try first? Let your taste buds explore the delicious world of coffee-infused cheesecakes!
Cooking Tips and Notes for Silky Coffee Cheesecake
Optimal Baking Times and Temperatures
When you’re whipping up this silky coffee cheesecake, achieving the perfect bake is crucial. Preheat your oven to 325°F (160°C)—a gentle temperature that ensures even cooking. Bake the cheesecake for about 55 to 65 minutes. You want it to be set around the edges but slightly jiggly in the center. This slight wobble means you’ll have that wonderfully creamy texture after cooling. Just think of it as a tender embrace for your taste buds!
The Importance of Chilling Time
Don’t skip the chilling process! After baking, let your cheesecake cool in the pan for an hour before transferring it to the fridge. Ideally, it should chill for at least four hours, though overnight is best. This allows the flavors to meld beautifully and the texture to firm up, creating the silkiness you crave. Trust me, a proper chill really makes a world of difference!
For more great tips, check out Serious Eats, where they dive deeper into cheesecake techniques!
Serving Suggestions for Silky Coffee Cheesecake
Gourmet Toppings to Enhance the Experience
Elevate your silky coffee cheesecake with an array of gourmet toppings that can take your dessert to the next level. Here are some suggestions to consider:
- Whipped Cream: A dollop of lightly sweetened whipped cream brings a lovely texture contrast.
- Chocolate Shavings: Add shaved dark chocolate for a rich, elegant touch.
- Caramel Sauce: Drizzling a bit of homemade or store-bought caramel can add a delightful sweetness.
- Crushed Coffee Beans: For the coffee aficionados, sprinkle some crushed coffee beans on top for added texture and bold flavor.
- Chopped Nuts: Almonds or hazelnuts can introduce a crunchy element that beautifully complements the creaminess.
Each topping not only enhances the visual appeal but also deepens the flavor, making every bite a bit more exciting.
Perfect Pairings with Beverages
To truly enjoy your silky coffee cheesecake, consider the beverages you serve alongside it. Here are some excellent choices:
- Cold Brew Coffee: This can intensify the coffee flavors without being too overwhelming.
- Espresso: For a classic pairing that coffee lovers will appreciate.
- Herbal Tea: A light chamomile or mint tea can cleanse the palate between bites and balance the dessert’s richness.
- Sparkling Water: The effervescence can counteract the richness of the cheesecake, making each bite feel lighter.
Feeling adventurous? Try experimenting with unique flavors or even homemade drinks to see what resonates!
For an in-depth guide on perfect beverage pairings, consider checking out The Spruce Eats.
Time Breakdown for Silky Coffee Cheesecake
When it comes to making a silky coffee cheesecake, it’s important to manage your time effectively to ensure a delicious outcome. Here’s a quick breakdown of the essential time needed for each stage:
Preparation Time
Getting everything ready takes about 30 minutes. This includes gathering your ingredients like cream cheese, sugar, and of course, your favorite coffee blend. Remember, having everything prepped can make a world of difference!
Baking Time
Once your cheesecake is prepped and in the oven, it’ll need around 60 minutes to bake. Don’t worry too much about precise baking; checking for a slight jiggle in the center ensures it’s just right.
Cooling Time
After baking, let your silky coffee cheesecake cool for at least 4 hours. For best results, refrigerate overnight. This allows all those flavors to meld beautifully.
Total Time
Adding it all together, you’re looking at approximately 5 to 6 hours. It sounds like a lot, but the final result is so worth it! By planning ahead, you’ll not only save time but also impress your friends with your culinary skills. For more tips on managing your time in the kitchen, check out this helpful resource for kitchen efficiency.
Nutritional Facts for Silky Coffee Cheesecake
When indulging in a slice of silky coffee cheesecake, it’s helpful to know the nutritional profile of this delightful dessert.
Calories Per Slice
Each slice of silky coffee cheesecake contains approximately 320 calories. It’s a manageable treat that fits nicely into a balanced diet if enjoyed in moderation.
Protein Content
This cheesecake boasts around 6 grams of protein per slice, thanks to the cream cheese and eggs. It helps keep you satisfied, making it a great choice when you’re craving something sweet yet substantial.
Sugar and Carb Breakdown
With about 25 grams of sugar and 40 grams of carbohydrates, the silky coffee cheesecake offers a rich flavor experience. While the sugar content might seem high, by using healthier alternatives, you can keep those numbers in check. Increasing your knowledge about ingredients can lead to healthier choices in your baking adventures—explore more on Healthline for insights on sugar alternatives!
You’ll love enjoying this dessert knowing you’re sharing quality moments with friends while treating yourself to something exquisite!
FAQs about Silky Coffee Cheesecake
What if I don’t have a springform pan?
No springform pan? No problem! You can still whip up this silky coffee cheesecake using a regular round baking dish. Just ensure you line the bottom and sides with parchment paper to make removal easier after baking. If you’re feeling adventurous, you could also try baking in individual ramekins for delightful personal portions. Just be mindful of the reduced baking time!
Can I use a different sweetener?
Absolutely! If you’re looking to personalize the sweetness in your silky coffee cheesecake, you can swap out sugar for several alternatives. Try using honey, maple syrup, or agave nectar for a natural touch. Just note that liquid sweeteners might alter the texture slightly, so you may need to adjust other ingredients accordingly. For a low-calorie option, sweeteners like stevia or erythritol can work well too. Remember to taste as you go!
How should I store leftover cheesecake?
Storing leftover silky coffee cheesecake is a breeze! First, cover it with plastic wrap or transfer pieces to an airtight container. It will keep in the refrigerator for up to five days. If you want to indulge later, consider freezing portions. Just wrap them tightly in plastic wrap and place them in a freezer-safe container. When you’re ready to enjoy, thaw overnight in the fridge for the best texture.
For more creative coffee dessert recipes, check out this guide on epicurious.com here or explore cheesecake tips on spoonforkbacon.com here.
With these tips in mind, you’re all set to create a delicious silky coffee cheesecake that’ll impress your friends and family!
Conclusion on Silky Coffee Cheesecake
The Joy of Celebrating Homemade Desserts
Indulging in a silky coffee cheesecake is about more than just the flavors—it’s a celebration of creativity in the kitchen! Homemade desserts offer a unique opportunity to create lasting memories with friends and family. Every slice is a reminder that you took the time to craft something special.
When hosting or simply enjoying a quiet evening, a cheesecake like this one elevates the occasion. Plus, you can customize the recipe to suit your taste, whether it’s by adjusting the coffee intensity or introducing your favorite toppings.
Why not share your creations? Join online communities or document your dessert journey on social platforms to inspire others. For more baking inspiration, explore resources like BBC Good Food for various dessert ideas and tips.
In the end, baking a silky coffee cheesecake is a delightful way to express love and creativity, making moments even sweeter.
PrintSilky Coffee Cheesecake with Chocolate Ganache: An Indulgent Treat
A rich and creamy coffee cheesecake topped with a decadent chocolate ganache, perfect for dessert lovers.
- Prep Time: 30 minutes
- Cook Time: 1 hour
- Total Time: 5 hours 30 minutes
- Yield: 12 servings 1x
- Category: Dessert
- Method: Baking
- Cuisine: American
- Diet: Vegetarian
Ingredients
- 1 ½ cups almond flour
- 1/4 cup unsweetened cocoa powder
- 3 tablespoons melted butter
- 2 cups cream cheese
- 1 cup granulated sugar
- 1 cup sour cream
- 3 large eggs
- 1 tablespoon instant coffee granules
- 1 teaspoon vanilla extract
- 1 cup dark chocolate chips
- 1/2 cup heavy cream
Instructions
- Preheat the oven to 325°F (160°C).
- In a mixing bowl, combine almond flour, cocoa powder, and melted butter.
- Press the mixture into the bottom of a springform pan.
- In a separate bowl, beat the cream cheese and sugar until smooth.
- Add sour cream, eggs, instant coffee, and vanilla; mix well.
- Pour the filling over the crust and bake for 50-60 minutes.
- Let it cool and refrigerate for at least 4 hours.
- For the ganache, heat the heavy cream until simmering, then pour over dark chocolate chips and stir until smooth.
- Pour the ganache over the chilled cheesecake and let it set.
- Serve and enjoy!
Notes
- Ensure all ingredients are at room temperature for better mixing.
- For a stronger coffee flavor, increase the instant coffee granules.
Nutrition
- Serving Size: 1 slice
- Calories: 350
- Sugar: 25g
- Sodium: 150mg
- Fat: 25g
- Saturated Fat: 15g
- Unsaturated Fat: 8g
- Trans Fat: 0g
- Carbohydrates: 30g
- Fiber: 3g
- Protein: 5g
- Cholesterol: 100mg
Keywords: coffee cheesecake, chocolate ganache, dessert, indulgent treat