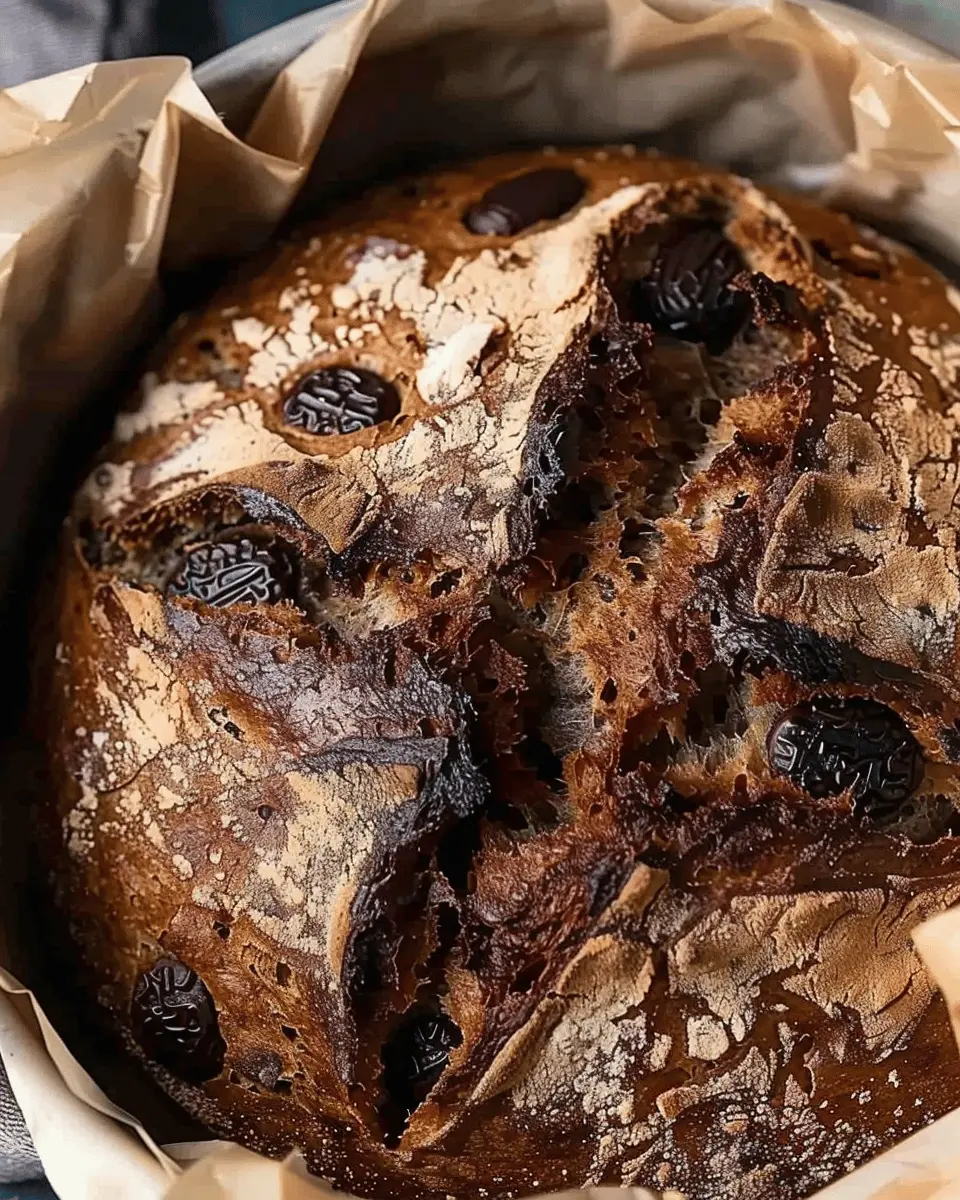
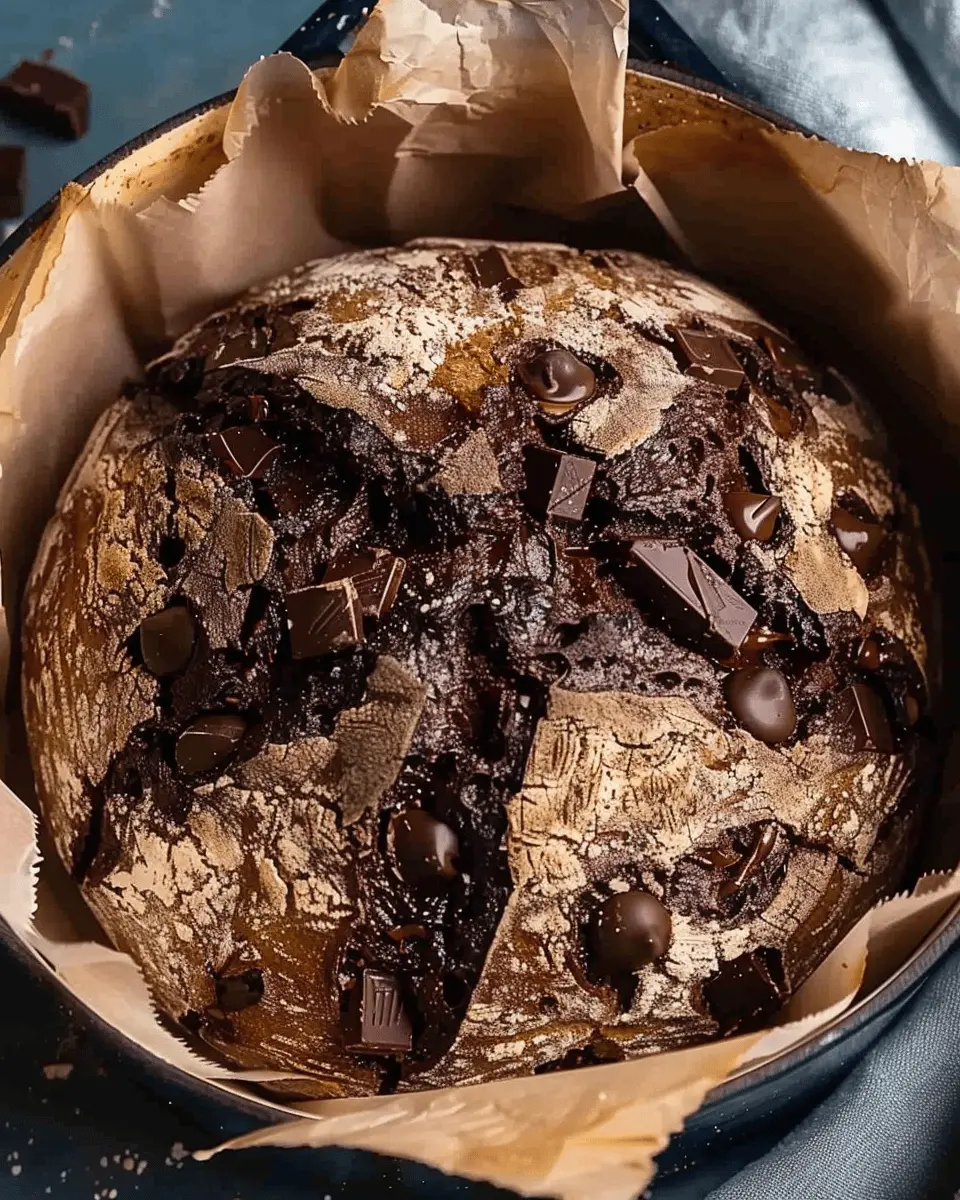
Introduction to Chocolate Chunk Dutch Oven Bread
Baking your own bread is not just a culinary skill; it’s a transformative experience. Picture this: you wake up on a Sunday morning, the sun streaming through your kitchen window, and the intoxicating aroma of freshly baked bread fills your home. This isn’t just any bread; today, we’re diving into the delightful world of Chocolate Chunk Dutch Oven Bread. This easy recipe is a game-changer, bringing together the warmth of homemade bread and the decadent indulgence of chocolate!
Why Homemade Bread Is a Game-Changer
So, why is making bread at home such a big deal? For starters, homemade bread tends to be fresher, healthier, and simply more delicious than store-bought varieties. Did you know that most commercial breads contain preservatives? According to the American Heart Association, creating bread at home allows you to control the ingredients, ensuring you’re one step closer to that perfect loaf without all the additives.
But it’s not just about health—there’s something incredibly satisfying about kneading dough and watching it rise. Earn bragging rights among friends when you pull out your warm Chocolate Chunk Dutch Oven Bread, its crust golden-brown and its interior soft and chewy. Plus, the Dutch oven method creates a unique crust and moist interior that’s hard to replicate with traditional baking trays.
-
Personal Connection: I often think back to baking sessions with my grandmother. She’d always say, “The secret ingredient is love.” By investing time in making your own bread, you’re not just nourishing body and soul; you’re creating lasting memories.
-
Versatile for Any Meal: This Chocolate Chunk Dutch Oven Bread pairs beautifully with various meals. Whether it’s a warm breakfast with some Turkey Bacon or a casual afternoon snack with coffee, having a loaf on hand makes every moment feel special.
-
Enticing Customizations: Feel free to experiment! Swap out chocolate chunks for nuts or dried fruits, or try adding spices like cinnamon for a warm twist.
Ready to embark on a baking adventure? Grab your ingredients, and let’s channel our inner bakers to create the most mouth-watering loaf of Chocolate Chunk Dutch Oven Bread!
Ingredients for Chocolate Chunk Dutch Oven Bread
Baking doesn’t have to be intimidating, especially when you can prepare scrumptious Chocolate Chunk Dutch Oven Bread with just a handful of ingredients. Let’s break down what you’ll need to get started.
Essential ingredients you need
To create this delicious bread, you’ll need:
- Flour: All-purpose works great; it gives the bread a nice structure.
- Sugar: A touch of sweetness; feel free to use brown sugar for added depth.
- Baking Powder and Salt: These are essential for leavening and flavor.
- Chocolate Chunks: Using high-quality dark chocolate can elevate your bread experience.
- Milk: Whole milk adds richness, but you can substitute with almond or oat milk for a dairy-free option.
- Egg: Helps bind everything together.
Optional ingredient ideas to boost flavor
If you’re feeling adventurous, consider these optional ingredients to take your Chocolate Chunk Dutch Oven Bread to the next level:
- Nuts: Chopped walnuts or pecans add crunch and depth.
- Spices: A dash of cinnamon or nutmeg can warm up the flavor profile.
- Dried fruit: Add some cranberries or cherries for a fruity twist.
Baking is as much about creativity as it is about following a recipe, so don’t hesitate to experiment! For more tips on enhancing your baking skills, check out this comprehensive guide.
Step-by-Step Preparation of Chocolate Chunk Dutch Oven Bread
Baking Chocolate Chunk Dutch Oven Bread is one of those rewarding experiences that fills your home with warmth and an irresistible aroma. Whether you’re looking for a cozy weekend project or want to impress friends with freshly baked goods, this guide will walk you through the simple steps of crafting this delightful bread. Let’s dive in!
Gather your ingredients
First things first—before you start baking, it’s essential to ensure you have all your ingredients lined up. For this easy recipe, you’ll need:
- 3 cups all-purpose flour
- 1 ½ teaspoons salt
- 1 teaspoon baking soda
- 1 ½ cups buttermilk (or a mixture of milk and vinegar as a substitute)
- 1 cup chocolate chunks (semi-sweet or dark, based on your preference)
Don’t forget to preheat your oven to 450°F (232°C) so it’s nice and hot when your dough is ready to bake.
Mixing the dry ingredients
In a large mixing bowl, combine your dry ingredients: flour, salt, and baking soda. It’s crucial to achieve an even mix; otherwise, you may end up with pockets of salt. I recommend using a whisk to aerate the mixture, ensuring it’s light and fluffy.
This step is foundational for any bread recipe. The baking soda will react with the acidity in the buttermilk, creating a light and airy texture in your finished loaf. For more on the science behind bread baking, check out King Arthur Baking’s Flour Basics.
Adding your wet ingredients
Next, create a well in the center of your dry mixture and pour in the buttermilk. Using a wooden spoon or spatula, gently mix until the flour is mostly incorporated. Be careful not to overmix; a few lumps are perfectly fine! As you combine the ingredients, you’ll begin to smell that delightful blend coming together.
Incorporating the chocolate chunks
Once your dough is mostly combined, it’s time to fold in those luscious chocolate chunks. These rich morsels will melt just a bit during baking, creating pockets of gooey chocolate throughout the bread. This is where you decide how chocolatey you want your loaf to be!
For a decadent touch, consider adding a pinch of sea salt on top before baking. It elevates the sweetness of the chocolate beautifully.
Kneading the dough
On a lightly floured surface, turn out your dough. Gently knead it for about 5-10 minutes. It should be smooth and elastic, but be cautious not to over-knead; remember, we’re making a rustic bread here.
Kneading contributes to gluten development, essential for a good rise. If you’re unsure about kneading, there’s some great instructional material available on YouTube.
Letting the dough rise
Place your kneaded dough back in the mixing bowl, cover it with a clean kitchen towel, and let it rise in a warm spot for about an hour. You want the dough to double in size. This step might feel like it takes forever, but trust me, it’s worth the wait!
Shaping the dough
Once your dough has risen, it’s time to shape it into a round loaf. Turn the dough out onto a floured surface and gently flatten it. Fold the edges toward the center and form a ball. This will create surface tension, which is vital for that perfect rise in the oven.
Preparing the Dutch oven
Before your bread goes in the oven, you’ll need to prepare your Dutch oven. Place it in the oven while it preheats, ensuring it gets super hot—this mimics a professional steam oven and produces a crisp crust. Hold on—don’t put the dough in just yet!
Baking the bread
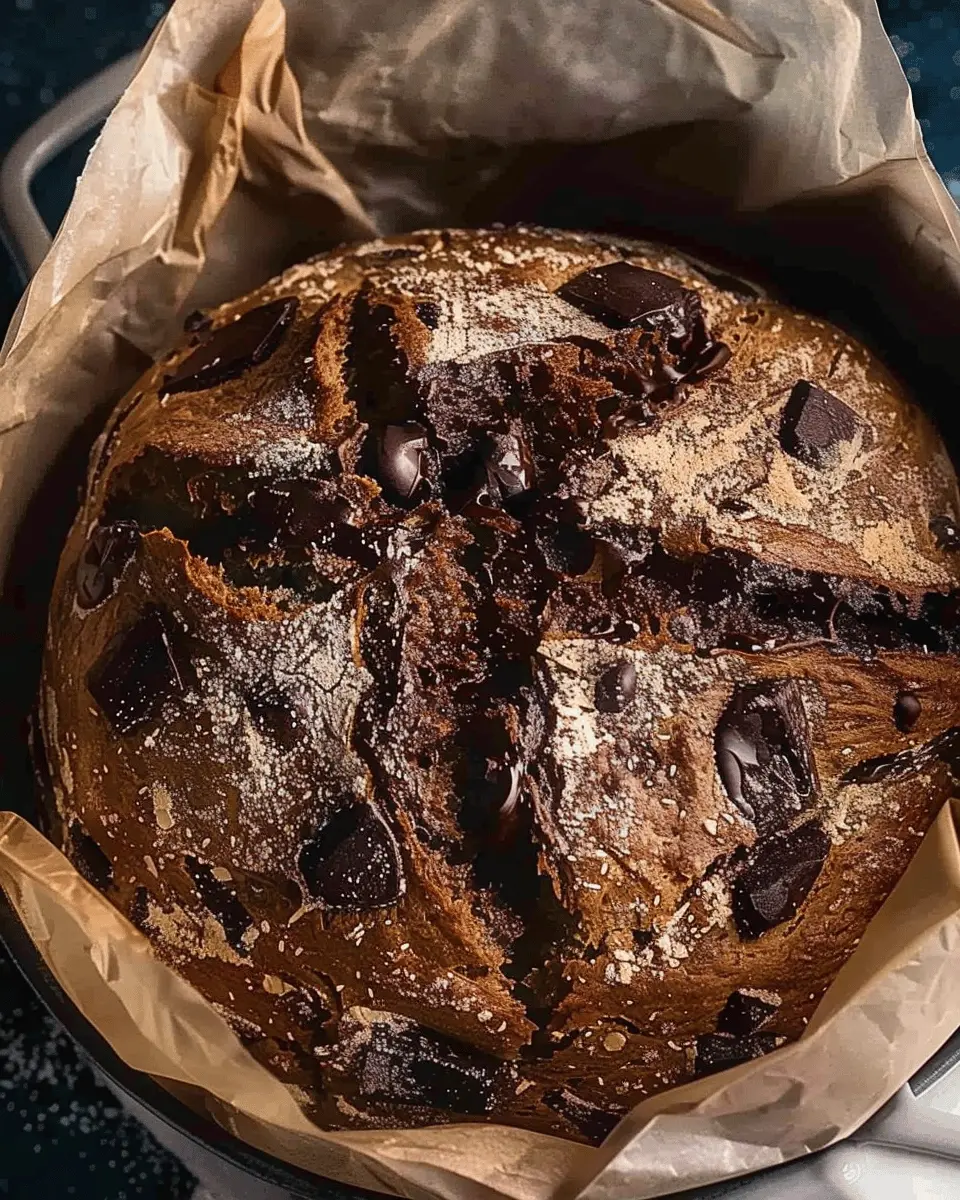
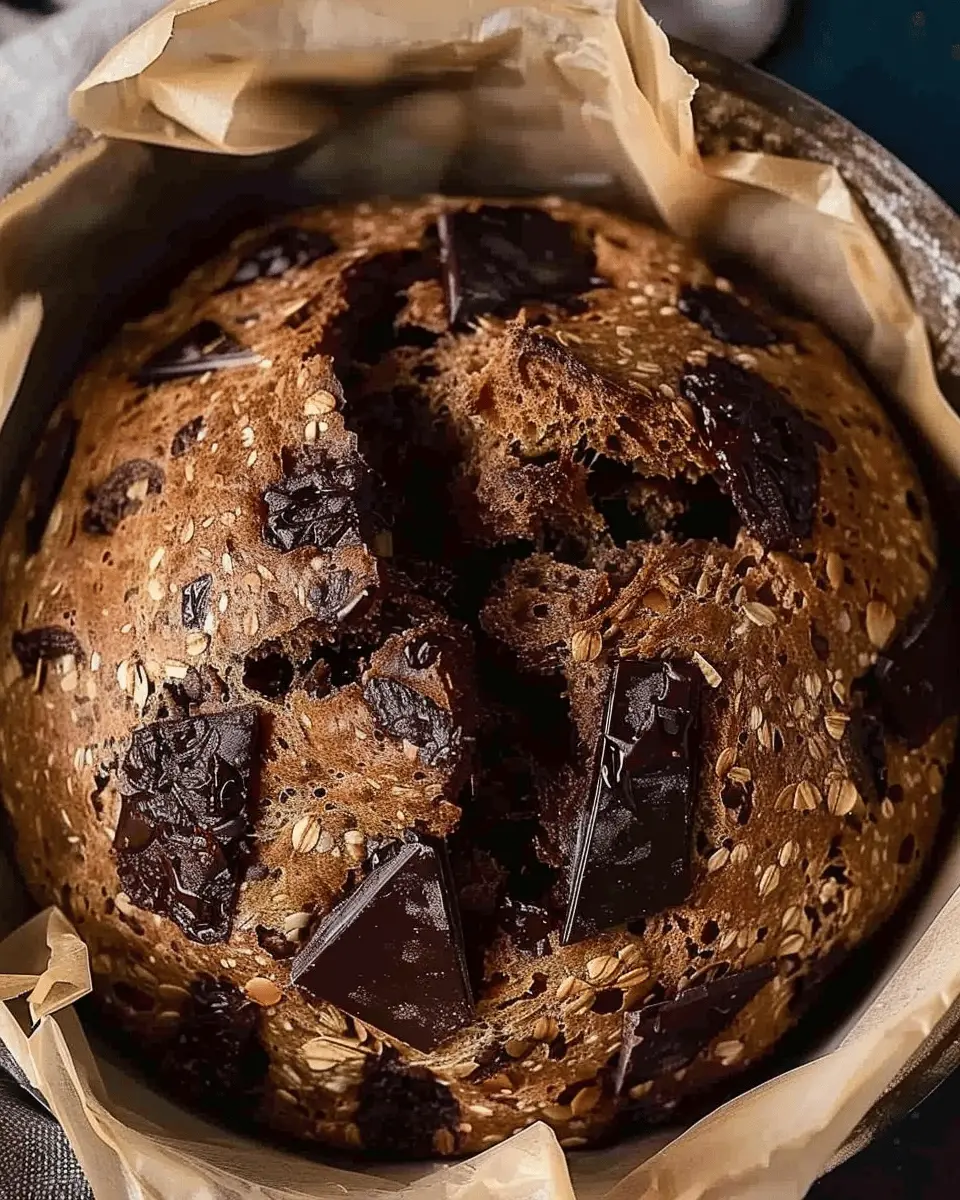
Carefully remove the Dutch oven and place your shaped dough inside (you can either use parchment paper or simply place it directly). Cover with the lid and bake for 30 minutes. After this initial bake, remove the lid and let it bake for another 15-20 minutes for a beautiful golden-brown crust.
When it’s ready, you’ll know—your kitchen will smell heavenly. Remove your Chocolate Chunk Dutch Oven Bread from the pot, and let it cool on a wire rack.
And there you have it—a step-by-step guide to making your own delicious bread that will impress anyone who takes a bite. Enjoy!
Variations of Chocolate Chunk Dutch Oven Bread
Making Chocolate Chunk Dutch Oven Bread is a delightful experience, but why stop at the classic recipe? Here are some fun variations that can elevate your baking game!
Adding Nuts for Extra Crunch
Incorporating nuts such as walnuts or pecans can enhance the texture of your Chocolate Chunk Dutch Oven Bread. The crunch pairs beautifully with the soft, warm bread and melty chocolate. Aim for about a cup of roughly chopped nuts—just fold them into the dough before the final rise. This will ensure they’re evenly distributed. Plus, nuts add a healthy dose of protein and can keep you feeling fuller!
Experimenting with Different Types of Chocolate
While classic semi-sweet chocolate chunks are a must, why not expand your palate? Try using dark chocolate for a richer flavor or milk chocolate for a sweeter taste. You could also explore adding white chocolate chunks for a surprising twist. Some bakers even recommend mixing chocolate types for a gourmet experience, ensuring every bite is a delightful surprise. Check out this chocolate varieties guide for ideas!
Incorporating Flavors Like Cinnamon or Vanilla
Enhancing your Chocolate Chunk Dutch Oven Bread with additional flavors can make your creation stand out. A teaspoon of vanilla extract adds warmth and complexity, while a sprinkle of cinnamon offers a comforting touch. You can combine cinnamon with chocolate for a classic pairing, reminiscent of cozy bakery treats. Don’t hesitate to get creative with spices like nutmeg or even a hint of espresso for a little caffeine boost!
With these variations, your Chocolate Chunk Dutch Oven Bread is sure to impress! So grab your ingredients and get baking—your taste buds will thank you!
Cooking Tips and Notes for Chocolate Chunk Dutch Oven Bread
Common Pitfalls to Avoid
When crafting your Chocolate Chunk Dutch Oven Bread, steer clear of these common mistakes:
- Incorrect dough hydration: Not enough water makes for a dry loaf. Ensure your dough is sticky but manageable. A well-hydrated dough will yield a beautifully chewy texture.
- Overmixing: Mix just until combined. Overworking your dough will lead to a dense bread instead of the light, airy crumb you crave.
- Skipping the preheating step: Preheat your dutch oven while the dough rises. This helps achieve a crusty exterior and a soft interior—who doesn’t love that contrast?
Storage Tips for Your Homemade Bread
Proper storage will keep your Chocolate Chunk Dutch Oven Bread fresh. Here’s how:
- Cool completely before storing to prevent sogginess.
- Use a bread bag or wrap it in a clean kitchen towel. This keeps the crust crispy while maintaining moisture.
- For longer storage, slice the bread and freeze it in an airtight bag. It will last for up to two months—perfect for those late-night chocolate cravings!
For more tips on bread storage, check out King Arthur Baking’s insights.
Serving Suggestions for Chocolate Chunk Dutch Oven Bread
Pairing with Spreads or Dips
When it comes to enjoying your Chocolate Chunk Dutch Oven Bread, the right spread can elevate the entire experience. Consider slathering on some creamy peanut butter for a dose of protein and healthy fats. It complements the sweetness of the chocolate beautifully. If you’re in the mood for something indulgent, a thick layer of Nutella could be your new go-to. Alternatively, why not try a tangy cream cheese spread mixed with a hint of lemon zest? This adds a fresh brightness that plays well against the richness of the bread.
For an easy appetizer, serve your bread alongside a warm chocolate dip or a light fruit compote. Both options bring out the cozy, comforting elements of your fresh-baked treat.
Creative Toast Ideas Using Your Bread
Toast can become a standout dish with your Chocolate Chunk Dutch Oven Bread. Top slices with Turkey Bacon, sliced avocado, and a drizzle of honey for a savory twist. This recipe from Bon Appétit can inspire your variations!
Another idea is to build an open-faced breakfast sandwich. Layer on some soft scrambled eggs, Chicken Ham, and a sprinkle of fresh herbs to create a delightful brunch option. Feeling adventurous? Create a dessert toast with ricotta, fresh fruit, and a sprinkle of pistachios for a beautiful, colorful treat.
Now you’re ready to explore all the delicious ways to enjoy your Chocolate Chunk Dutch Oven Bread!
Time Breakdown for Chocolate Chunk Dutch Oven Bread
When you’re ready to dive into the delicious world of Chocolate Chunk Dutch Oven Bread, it helps to know the timing for each step. Here’s a straightforward breakdown to keep you on track.
Preparation Time
Getting started takes about 15 to 20 minutes. Gather your ingredients, mix your dough, and prepare for the magic to begin.
Rising Time
Patience is key here! Allow the dough to rise for about 1 to 2 hours. This step is crucial for achieving that airy texture and scrumptious flavor. If you want to learn more about bread rising techniques, check out this helpful guide.
Baking Time
The baking process in your Dutch oven will take roughly 30 to 40 minutes. You’ll want that perfect golden crust, so keep an eye on it as it bakes.
Total Time
In total, you’re looking at about 2 to 3 hours from start to finish. In the end, you’ll be rewarded with a heavenly loaf of Chocolate Chunk Dutch Oven Bread that’s worth every minute spent!
Nutritional Facts for Chocolate Chunk Dutch Oven Bread
Calories per serving
When indulging in your Chocolate Chunk Dutch Oven Bread, it’s helpful to know that one serving typically contains around 250 calories. This makes it a delightful treat without completely derailing your daily intake.
Breakdown of macronutrients
The Chocolate Chunk Dutch Oven Bread is a good balance of flavors and nutrients. Here’s a closer look at its macronutrient composition per serving:
- Carbohydrates: 45g
- Protein: 6g
- Fats: 7g
This bread not only satisfies your sweet tooth but also provides a bit of protein, making it a delightful snack or breakfast option.
Dietary considerations
If you’re keeping an eye on specific dietary needs, this Chocolate Chunk Dutch Oven Bread is a versatile choice. While it does contain gluten, which can be a concern for those with sensitivities, substituting with gluten-free flour is an option. Also, consider reducing the sugar for a healthier version. For more insights on healthy baking alternatives, check out sources like the American Heart Association.
This delicious, warm loaf can complement various diets if you tailor it to your needs. So, gather your ingredients and enjoy each slice with mindfulness!
FAQs About Chocolate Chunk Dutch Oven Bread
Can I use whole wheat flour instead of all-purpose?
Absolutely! You can substitute whole wheat flour for all-purpose flour in your Chocolate Chunk Dutch Oven Bread, but keep in mind that it will change the texture and flavor of the bread. Whole wheat tends to make the bread denser, which is great if you’re aiming for a heartier loaf. If you choose to go this route, consider using about 25-50% whole wheat flour and the rest all-purpose to strike a balance. For a deeper dive, check out The Kitchn.
How can I ensure my bread is fluffy?
Getting that perfect, fluffy texture is key to a delicious loaf. Here are some tips to boost your bread’s fluffiness:
- Don’t skip the kneading: Ensure you knead the dough well to develop gluten.
- Check yeast freshness: Always use fresh yeast. A quick test: dissolve a bit in warm water with sugar; if it bubbles, you’re good to go!
- Proof correctly: Make sure the dough has enough time to rise in a warm, draft-free environment.
What should I do if my dough doesn’t rise?
If your dough isn’t rising, there are a few troubleshooting steps:
- Temperature check: Is your kitchen too cold? Yeast loves warmth.
- Replenish your yeast: If it’s not activating in warm water, it might be expired.
- Let it rest longer: Sometimes, your dough just needs a little extra time. Patience is key in bread-making!
Remember, baking is a science, and it might take a little practice to get everything just right. Happy baking!
Conclusion on Chocolate Chunk Dutch Oven Bread
Recap of the joys of baking at home
Baking your own Chocolate Chunk Dutch Oven Bread can be an incredibly rewarding experience. The aroma that fills your kitchen is just the beginning; the joy of pulling a golden-brown loaf from the oven is unmatched. When you bake at home, you’re not only creating delicious food but also crafting memories with friends and family.
- Easy to Customize: Experiment with ingredients to make the recipe truly yours.
- Freshness Guaranteed: Enjoy warm, fresh bread that perfect store-bought options simply can’t match.
- Therapeutic Process: Baking can be a delightful way to unwind after a long day.
So why not embrace the joy of baking? For tips on sourdough or similar recipes, check out resources like the King Arthur Baking Company or America’s Test Kitchen. Happy baking!
PrintChocolate Chunk Dutch Oven Bread: Easy Recipe for Bread Lovers
This easy chocolate chunk Dutch oven bread is perfect for bread lovers looking for a delicious treat.
- Prep Time: 15 minutes
- Cook Time: 45 minutes
- Total Time: 13 hours
- Yield: 1 loaf 1x
- Category: Bread
- Method: Baking
- Cuisine: American
- Diet: Vegetarian
Ingredients
- 3 cups all-purpose flour
- 1 teaspoon salt
- 1 tablespoon sugar
- 1 teaspoon instant yeast
- 1 cup warm water
- 1 cup chocolate chunks
Instructions
- In a large bowl, combine flour, salt, sugar, and yeast.
- Add warm water and mix until a shaggy dough forms.
- Fold in the chocolate chunks.
- Cover the bowl and let it rest for 12-18 hours at room temperature.
- Preheat the oven to 450°F (232°C) with a Dutch oven inside.
- Turn the dough onto a floured surface, then shape it into a ball.
- Carefully place the dough in the hot Dutch oven and cover it.
- Bake for 30 minutes covered, then 15 minutes uncovered until golden brown.
Notes
- Let the bread cool before slicing to maintain texture.
- This bread can be customized with different add-ins like nuts or dried fruit.
Nutrition
- Serving Size: 1 slice
- Calories: 210
- Sugar: 5g
- Sodium: 200mg
- Fat: 3g
- Saturated Fat: 1g
- Unsaturated Fat: 2g
- Trans Fat: 0g
- Carbohydrates: 40g
- Fiber: 2g
- Protein: 5g
- Cholesterol: 0mg
Keywords: Chocolate Chunk Dutch Oven Bread, easy bread recipe, Dutch oven bread